
No Sew Rose Tutorial GNSMDFCH113524984
As a crocheter, we all get requests for hats with flowers and/or roses. I also use them often in pattern design, or home decor with my crochet items. I LOVE roll up roses, They are so cute and there are so many GREAT patterns out there! The issue for me is getting the "rolling up" part correct. Ideally, if you roll the rose correctly you get a perfectly even spiral base, and then kind of pin the petals where you would like them with small stitches. Click HERE to pin the project the actual hat I made for later.
Earlier this year I got an order for one of those famous Russian Cloche Hats we have seen go viral in the crochet world. Here is how I got it hooked:
I couldn't quite find a pattern I liked in english. Most english patterns I found were converted to worsted weight, and I wanted to use mercerized thread like in the viral photo. I found the original video in Russian, (if you are interested watch the video I used for the top HERE) and adapted it by an increase for a child age 6, instead of a toddler. I also changed my band by dropping to a B hook with SC for one row at the brim, then one row with an SC INC each 8th stitch, and then followed an english for the brim (HERE if you are interested) However, the flowers were not included in the lovely video in Russian. SO, I went to my trusty favorite roll up rose pattern by, Kati Crafts. I always use Kati Crafts Crochet Rose pattern because I love that it can be done two ways with one pattern:

The hat of course, is thin and flexible, since it was worked in thread, and I am not great at making the back of my "roll up roses" flat......but my wheels started turning. It hit me, I don't HAVE to ROLL UP anything! You can turn ANY roll up rose pattern you love into a self contained piece with a flat back that you DON'T have to sew together at the end!!!

To turn any roll up rose pattern into a FLAT backed seamless simply locate your favorite roll up rose pattern. Got it? Great! Now we will replace the beginning chain of that pattern with this:
Make an increasing single crochet spiral, using just the back loops! (Note: Don't worry if you need a pattern to do this it is at the end of this blog post) First, you will need to see how many chains to begin with. My trusty Kati Crafts pattern starts with a chain of 118, but the 1st stitch is worked in the 4th chain from the hook. I will need a spiral single crochet base with 115 single crochets, because 118 chains counting 4 chains back from my hook, "118th, 117th, 116th, 115th chain!" I will need 115 stitches to work from and then I will chain 4 to get me to my total starting Chain of 118, then I will follow Kati Crafts pattern as it is written. The ONLY cut and join that would ever happen is if you desire the "Right Side" version of that rose you will finish off after her Row 2, and rejoin in the center of the rose to work the petals from the inner layer towards the outer layers.
In the spiral pattern below, the total stitch count (TSC), is listed at the end of each row. Depending on the roll up pattern you are using, you will stop when you have enough stitches. For the Kati Crafts pattern I need 115 stitches. That meant I stopped 25 stitches into Round 6. You will need to stop your spiral when you are at the accurate number of stitches. Also do not forget after your Spiral base, you need to chain the "beginning chain" which are the few chains you subtracted from your spiral count, where you worked back from the hook.

No Sew Roll Up Rose Pattern Tutorial
Materials; Gauge; Etc:
This tip should work with the same yarn and hook size as your roll up pattern instructs you to use, or whatever you are accustomed to using for your roll up flowers and roses.
Abbreviations:
CH - chain; BLO - back loop only; FLO - front loop only; SC - single crochet; SC INC - 2 SC in same stitch; ST - stitch; TSC - total stitch count
R1. In a magic circle; CH 1, SC 6, Place a piece of yarn between the1st and last ST of R1 to use as a ST marker, join to BLO of 1st SC with a TIGHT SC <6 ST> <Total Stitch Count 6>
Work in the round and in BLO for the rest of rounds
R2. SC in same ST, SC INC 5, Bring ST marker up <12 ST> <TSC 18>
R3. *(SC, SC INC), repeat from * 6 times total, bring ST marker up <18 ST> <TSC 36>
R4. *(SC 2, SC INC), repeat from * 6 times total, bring ST marker up <24 ST> <TSC 60>
R5. *(SC 3, SC INC), repeat from * 6 times total, bring ST marker up <30 ST> <TSC 90>
R6. *(SC 4, SC INC), repeat from * 6 times total, bring ST marker up <36 ST> <TSC 126>
Remember the pattern I used stopped partially in this round, be sure you stop at the appropriate place for your chosen roll up rose pattern
R7. *(SC 5, SC INC), repeat from * 6 times total, bring ST marker up <42 ST> <TSC 168>
R8. *(SC 6, SC INC), repeat from * 6 times total, bring ST marker up <48 ST> <TSC 212>
R9. *(SC 7, SC INC), repeat from * 6 times total, bring ST marker up <54 ST> <TSC 266>
Don't forget to add your "beginning chain" that you cut off from the "count back 4 chains from your hook" potion of the chain. For me this was 3....I single crochet spiraled 115, then chained numbers 116, 117, and 118. Now I am ready to begin Kati Crafts' pattern. I will skip the part of the roll up pattern that says to chain 118, because I have created that with our spiral in the round and chain 3.


Earlier this year I got an order for one of those famous Russian Cloche Hats we have seen go viral in the crochet world. Here is how I got it hooked:
I couldn't quite find a pattern I liked in english. Most english patterns I found were converted to worsted weight, and I wanted to use mercerized thread like in the viral photo. I found the original video in Russian, (if you are interested watch the video I used for the top HERE) and adapted it by an increase for a child age 6, instead of a toddler. I also changed my band by dropping to a B hook with SC for one row at the brim, then one row with an SC INC each 8th stitch, and then followed an english for the brim (HERE if you are interested) However, the flowers were not included in the lovely video in Russian. SO, I went to my trusty favorite roll up rose pattern by, Kati Crafts. I always use Kati Crafts Crochet Rose pattern because I love that it can be done two ways with one pattern:
The hat of course, is thin and flexible, since it was worked in thread, and I am not great at making the back of my "roll up roses" flat......but my wheels started turning. It hit me, I don't HAVE to ROLL UP anything! You can turn ANY roll up rose pattern you love into a self contained piece with a flat back that you DON'T have to sew together at the end!!!

Make an increasing single crochet spiral, using just the back loops! (Note: Don't worry if you need a pattern to do this it is at the end of this blog post) First, you will need to see how many chains to begin with. My trusty Kati Crafts pattern starts with a chain of 118, but the 1st stitch is worked in the 4th chain from the hook. I will need a spiral single crochet base with 115 single crochets, because 118 chains counting 4 chains back from my hook, "118th, 117th, 116th, 115th chain!" I will need 115 stitches to work from and then I will chain 4 to get me to my total starting Chain of 118, then I will follow Kati Crafts pattern as it is written. The ONLY cut and join that would ever happen is if you desire the "Right Side" version of that rose you will finish off after her Row 2, and rejoin in the center of the rose to work the petals from the inner layer towards the outer layers.
In the spiral pattern below, the total stitch count (TSC), is listed at the end of each row. Depending on the roll up pattern you are using, you will stop when you have enough stitches. For the Kati Crafts pattern I need 115 stitches. That meant I stopped 25 stitches into Round 6. You will need to stop your spiral when you are at the accurate number of stitches. Also do not forget after your Spiral base, you need to chain the "beginning chain" which are the few chains you subtracted from your spiral count, where you worked back from the hook.

No Sew Roll Up Rose Pattern Tutorial
Materials; Gauge; Etc:
This tip should work with the same yarn and hook size as your roll up pattern instructs you to use, or whatever you are accustomed to using for your roll up flowers and roses.
Abbreviations:
CH - chain; BLO - back loop only; FLO - front loop only; SC - single crochet; SC INC - 2 SC in same stitch; ST - stitch; TSC - total stitch count
R1. In a magic circle; CH 1, SC 6, Place a piece of yarn between the1st and last ST of R1 to use as a ST marker, join to BLO of 1st SC with a TIGHT SC <6 ST> <Total Stitch Count 6>
Work in the round and in BLO for the rest of rounds
R2. SC in same ST, SC INC 5, Bring ST marker up <12 ST> <TSC 18>
R3. *(SC, SC INC), repeat from * 6 times total, bring ST marker up <18 ST> <TSC 36>
R4. *(SC 2, SC INC), repeat from * 6 times total, bring ST marker up <24 ST> <TSC 60>
R5. *(SC 3, SC INC), repeat from * 6 times total, bring ST marker up <30 ST> <TSC 90>
R6. *(SC 4, SC INC), repeat from * 6 times total, bring ST marker up <36 ST> <TSC 126>
Remember the pattern I used stopped partially in this round, be sure you stop at the appropriate place for your chosen roll up rose pattern
R8. *(SC 6, SC INC), repeat from * 6 times total, bring ST marker up <48 ST> <TSC 212>
R9. *(SC 7, SC INC), repeat from * 6 times total, bring ST marker up <54 ST> <TSC 266>
Don't forget to add your "beginning chain" that you cut off from the "count back 4 chains from your hook" potion of the chain. For me this was 3....I single crochet spiraled 115, then chained numbers 116, 117, and 118. Now I am ready to begin Kati Crafts' pattern. I will skip the part of the roll up pattern that says to chain 118, because I have created that with our spiral in the round and chain 3.
Turn. Work R1 of your roll up pattern in the BLOs you now have available in a perfect spiral! After I work R1 of her gorgeous rose I should have THIS:

After R2 I should have this:

To make her wrong side Rose just turn and continue on to R3. To make the right side version just finish off, and rejoin to the center like this:

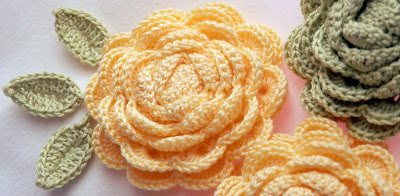
While you are over at her blog be sure you also check out her AH-MAZE-ZING beautiful work up of the Veined Leaf pattern by Wind Rose Fiber Studio too! They are the PERFECT compliment to the roses!
This is wonderful
ReplyDeleteThis is wonderful
ReplyDelete