Monday, October 7, 2024

Is It Knit Afghan - Free Crochet pattern

Is It Knit? (Free Crochet Blanket Pattern)


Materials:
20 skeins of Wander yarn. Buy them here!
Notions:
Furls 12mm resin crochet hook; Scissors; Measuring Tape
Sizes:
Finished size is 60" x 60"
Skill Level:
Beginner
Abbreviations:
CH = Chain; ST = Stitch; SL ST = Slip Stitch; 
SC = Single Crochet; DC = Double Crochet;
Gauge:
8 FPDC x 8 rows = 4"

Notes:
1) Each 2 skeins are crocheted together two strands at a time.  
2) Each 2 skeins will yield a 60" x 6" length of blanket.

R1: CH121, Beginning with the 2nd chain from the hook, and working in the back loop of the starting chain, DC all the way across <120 ST>
R2: CH1, FPDC across <120 ST>
R3: CH1, BPDC across <120 ST>
R4 - R60: Repeat R2 and R3 alternating until the blanket is your desired length.
Edging: Finish on a BPDC row. CH 1, turn, 2SC in the first ST and 1SC in each ST across until the last ST, work 2SC in the final ST before turning the corner, S3SC in the side of the 1st row, 2SC in the side of the next 58 rows, 3SC in the side of the last row, turn the corner and 2SC in the 1st ST, 1SC in the next 118 ST, 2SC in the last ST, turn the corner, 3SC in the side of the 1st row, 2 SC in the side of the next 58 rows, 3SC in the side of the last row, join to first ST and finish off. 


Weave in ends and you have a mock knit SUPER SNUGGLY SOFT afghan ready to go to your next gift-giving event! 

Love ALL our patterns?  You're in luck!!  All 130 patterns on Ravelry are 75% off through January 15th, 2024!!!!!!  No coupon is required!!!!!!


Sunday, June 2, 2024

Blender only - Sugar free chocolate fudge mousse the lazy way


Ingredients:

1 bag zero sugar Hersheys chocolate chips

2 cups very hot water (or espresso for a perky twist)

2 boxes of sugar free instant Chocolate Fudge flavored Jello Pudding

2 boxes of sugar free instant Vanilla flavored Jello Pudding 

1 quart of heavy cream separated into 2 cups brought to room temperature and 4 cups cold

1 can of ready whip

Makes 28 1/2 cup servings 


Instructions:

Blend the 2 cups of very very hot water and 1 bag of chocolate chips. Add the 2 cups of room temperature heavy cream. Blend until it looks like chocolate milk. Add 4 cups of cold heavy cream one at a time. Blend to chocolate milk each time. Add packets of pudding to blender one at a time and Blend to a chocolate milk consistency in between each one. Pour it in a dish. Let it set over night. Serve with Ready whip. 


Sunday, September 4, 2022

Low Carb No Bake Blender Pumpkin Cheesecake


Ingredients: 

  • 1/8 tsp ground ginger
  • 1/8 tsp nutmeg (double this if you prefer a heavy nutmeg flavor in your pumpkin items)
  • 1&1/2 tsp cinnamon
  • 15 oz can of pumpkin or puréed pumpkin (not pie filling) 7 net carbs 4 natural sugar 0 added sugars 
  • 1/8 cup sour cream 1 carb 1 sugar 
  • 8 ounces cream cheese SOFTENED 16 carbs 8 natural sugars 0 added sugar
  • 1 - 1ounce package sugar free jello cheesecake pudding mix
  • 1 cup heavy cream
  • 1/2 cup of swerve confectionery artificial sugar
  • 1 tsp vanilla extract (not vanilla flavor)
  • 1 diamond brand pecan pie ready made crust 72 carbs 48 natural sugar 24 added sugar
  • I can of rediwhip 

8 servings - 12 net carbs per slice (check your labels. Sugars and carbs may vary slightly depending on the brands used. 


Realize you have a ton of left over odd cans and things that could make a cool desert with the new Swerve brand artificial confectionery sugar substitute you discovered at the store. You shop cheap and found these weird pecan pie crusts for 66 cents. You’ve got some canned Pumpkin leftover from thanksgiving last year. Cream cheese is a staple in your household. Then find no pumpkin spice in your spice rack. And no allspice!!  Think a second…hmm, the ginger, nutmeg, cinnamon, and puréed pumpkin will have to carry the pumpkin flavor. Realize heavy cream has less carbs and more healthy fats than milk. Decide you want a definite smooth texture and need to offset the sweet…ah, the rest of the sour cream from taco night is perfect! Bring all Cream cheese to room temperature. Forget you’ve done this for about 12 hours. Realize and exclaim, “Oh! Crap!”, then run into the kitchen to see if the cream cheese is still useable. Happily discover it is indeed viable and then proceed to add all ingredients except the pie crust and rediwhip. There is probably an easier way to do this but I’m lazy so, next Blend on high until well blended. Pour into ready made pecan pie crust. Freeze 12 hours. Remove from freezer 1 hour before serving. Add rediwhip as decoration or by the slice. 8 slices yields a 3 ounce 12 net carb serving. 

Sunday, August 14, 2022

Sugar Free/Low carb Baked Chocolate Cheesecake

Sugar Free Baked chocolate cheesecake 

16 oz cream cheese 

48 packets or 1 cup of Splenda 

4 TBLS Hershey cocoa powder

1 TBLS heavy cream

1 tsp vanilla extract

2 eggs 


Preheat oven to 325 and grease 8” spring form pan. 


Combine cream cheese, eggs, heavy cream and vanilla extract. Use hand mixer. Blend until smooth. 


Combine Splenda, cocoa


Blend in Splenda and cocoa mix slowly until blended smooth. 


Bake 30 minutes or until center has just turned from liquid to baked. 


Top with nothing, sugar free chocolate syrup, sugar free fruit jam of choice, or both. Cut in 8 slices. 4 carbs per slice. 


Monday, July 4, 2022

Low sugar/ Low Carb Cherry Cordial Cream Cheese Mousse

Low Sugar/ Low carb Cherry Cordial Cream Cheese Mousse

I invent with what I have around the house in my cabinets. My hope is that some of you have some of these common items to make quality desserts low in sugar at home  

Recipe:

In 1 bowl combine ingredients below and mix with blender until smooth. Set aside

2 cups heavy cream

1 regular box cream cheese completely softened

3 tsp vanilla extract 


In a 2nd small bowl combine;

8 Tablespoons Hersheys cocoa powder

11 Tablespoons or 33 packets of Splenda (not granulated baking Splenda  

2 pinches of salt

4 tablespoons of full sugar cherry starburst jello. 


Add blended dry ingredients to first bowl. Fold in. Then mix on lowest speed until it begins to thicken. 

Set in fridge overnight. Spoon into desert dishes and top with whipped cream, cocoa powder, a cherry. Top with one all or none to please all the palates in your household. For a more bittersweet cocoa aftertaste definitely dust the mouse it self with cocoa powder before adding whipped cream, or even plain!


Yields 6 - 1/2 cup servings.

10 total carbs. 

   4g natural dairy sugars (from the cream cheese) 

   6g added sugars (from the jello) Dark chocolate cherry cheesecake mouse! Matt and I both really like this one! 


Friday, October 16, 2020

18" Doll Medical Cot Bed

 18” Doll Medical Cot Bed

Supplies:

-6 are spray paint can lids. Preferably spray paint can lids. Home Depot and Lowe’s will be them for free if you ask and plan ahead.  You could also use any similar sized can lid destined for the trash, as long as you have 6 

-Lots of bernat Blanket. Depending on color choices it changes what’s needed. If you made the whole bed one color you’d need 1.5 large balls

-plastic yarn needle (I never actually used one, I used a smaller hook and pulled the ends inside)

-scissors (I also never used these, I break my blanket yarn about 12" from where I want it to end.)

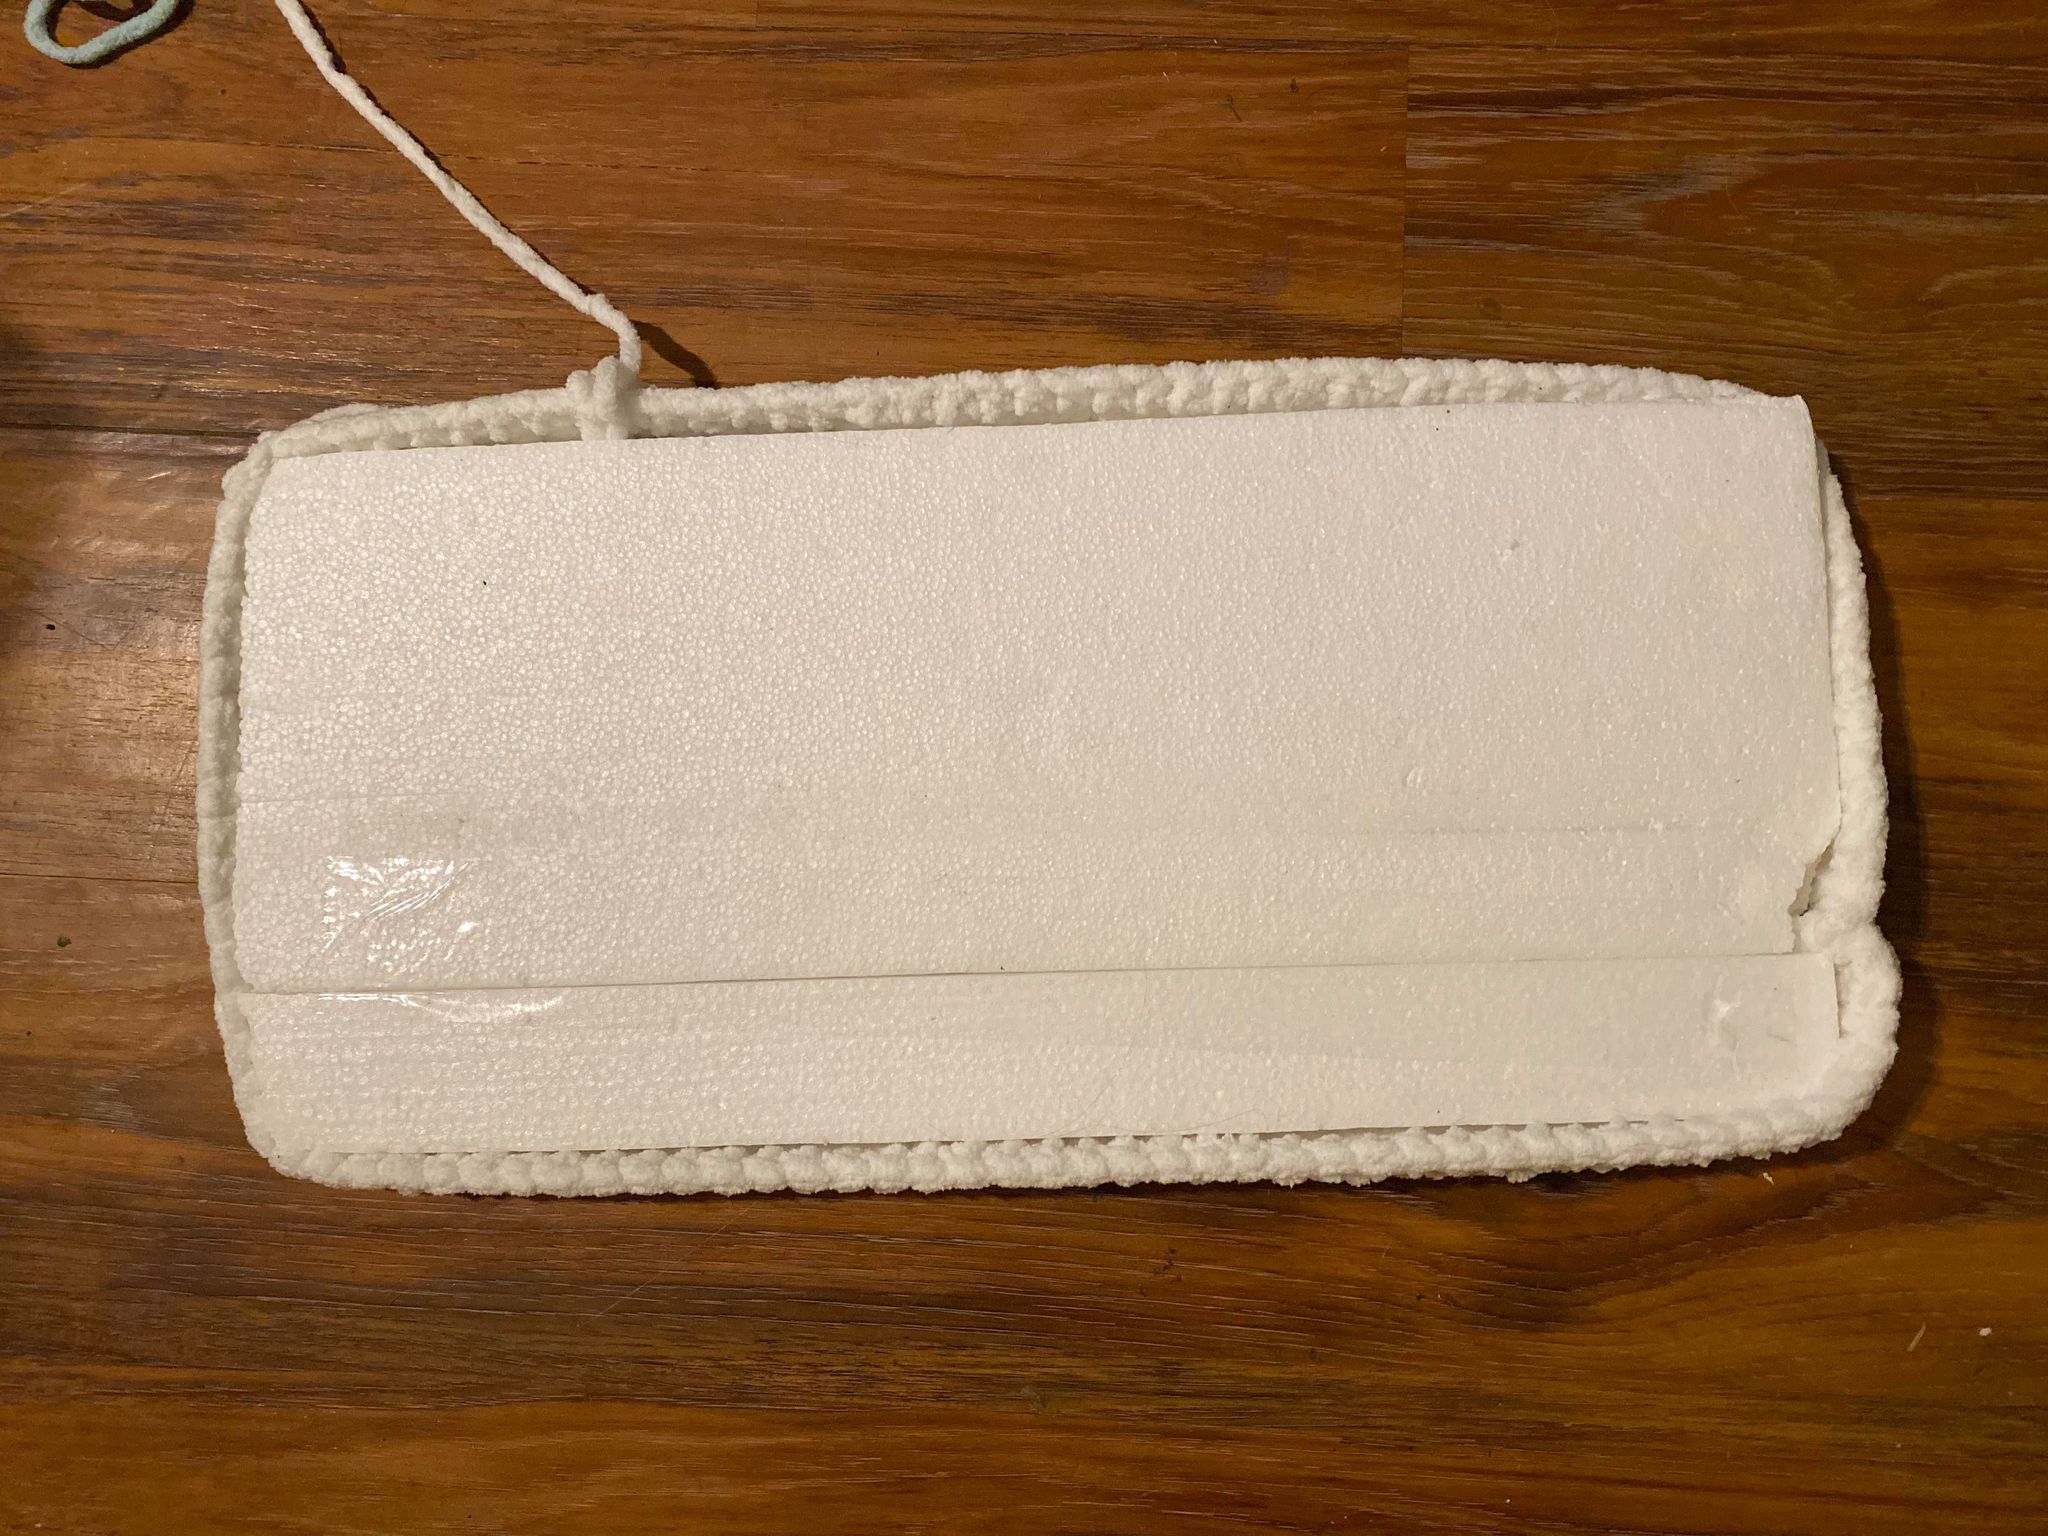
-8.5” x 18.5 x 1” or 1.5” foam. I used styrofoam to keep it out of a land fill. But any square edged foam will do. Floral foam.  Memory foam. Maybe even polyfill, but you might line it with corrugated card board or cut out a piece from a plastic lid to strengthen the cot.

1 Size K/6.5mm Sick Lil Monkeys Bubble Hook & 1 Size L/8.0mm Sick Lil Monkeys Bubble Hook (any 8mm hook will work, but obviously we are partial to ours!)


Abbreviations:

sl st - slip stitch

st - stitch

sc - single crochet

hdc - half double crochet


Top & bottom of bed

Make two:

With same color as sides and L/8.0mm hook:

R1: ch 41, work 1sc, in the back hump (not the front braid), in the 2nd chain from hook work and 1 sc into each hump on the back of the chain. Be careful not to twist your chain.  (40 st)

R2 - R18: Ch 1, turn, 1 sc in each st across (40 st)

Do not finish off. Ch 1, turn, place in sc in the BLO only of the next 40 st (this will create a “line” on the side of the top of the mattress), as you turn the corner, work 3 sc in the end of the first row, then work 1 sc at the end of the next 16 rows, then work 3 sc in the end of the last row, (20 sc) turn the corner and place 1 sc in the BLO only for 40 st (this will place a line down the other side of the mattress), as you turn the final corner, work 3 sc in the end of the first row, then work 1 sc at the end of the next 16 rows, then work 3 sc in the end of the last row (20 sc), Join to 1st sc of edging round. Do not finish off the 2nd one you make. Finish off the 1st one you make. (124 st)

Doll bed sides

With size K/6.5mm hook

R1: Ch 3, sc in 2nd sc from hook (2 st)

R2-R93: ch 1, turn, *(2sc in 1st, 1sc in next st) (124 st)

Join two short ends with sl st or whip stitch. 


Once you have joined the long strip into a circle by sl st, turn and add an sc border all the way around, use the side of each row ch 1, *(2sc in 1st, 1sc in next st), repeat from * until you’re back to the start and join to 1st st with a sl st. (124 st) finish off. 

Turn it over and join again.  Repeat the same edging process to the other side of the doll bed side piece. 

Once you have bordered all 4 sides on the top and bottom with a sc border check to be sure it fits your foam.  Then use safety pin or stitch marker to hold your corners together.


Then crochet the top to the sides with one row around of (124 sc) join ends with sl st, Finish off. 
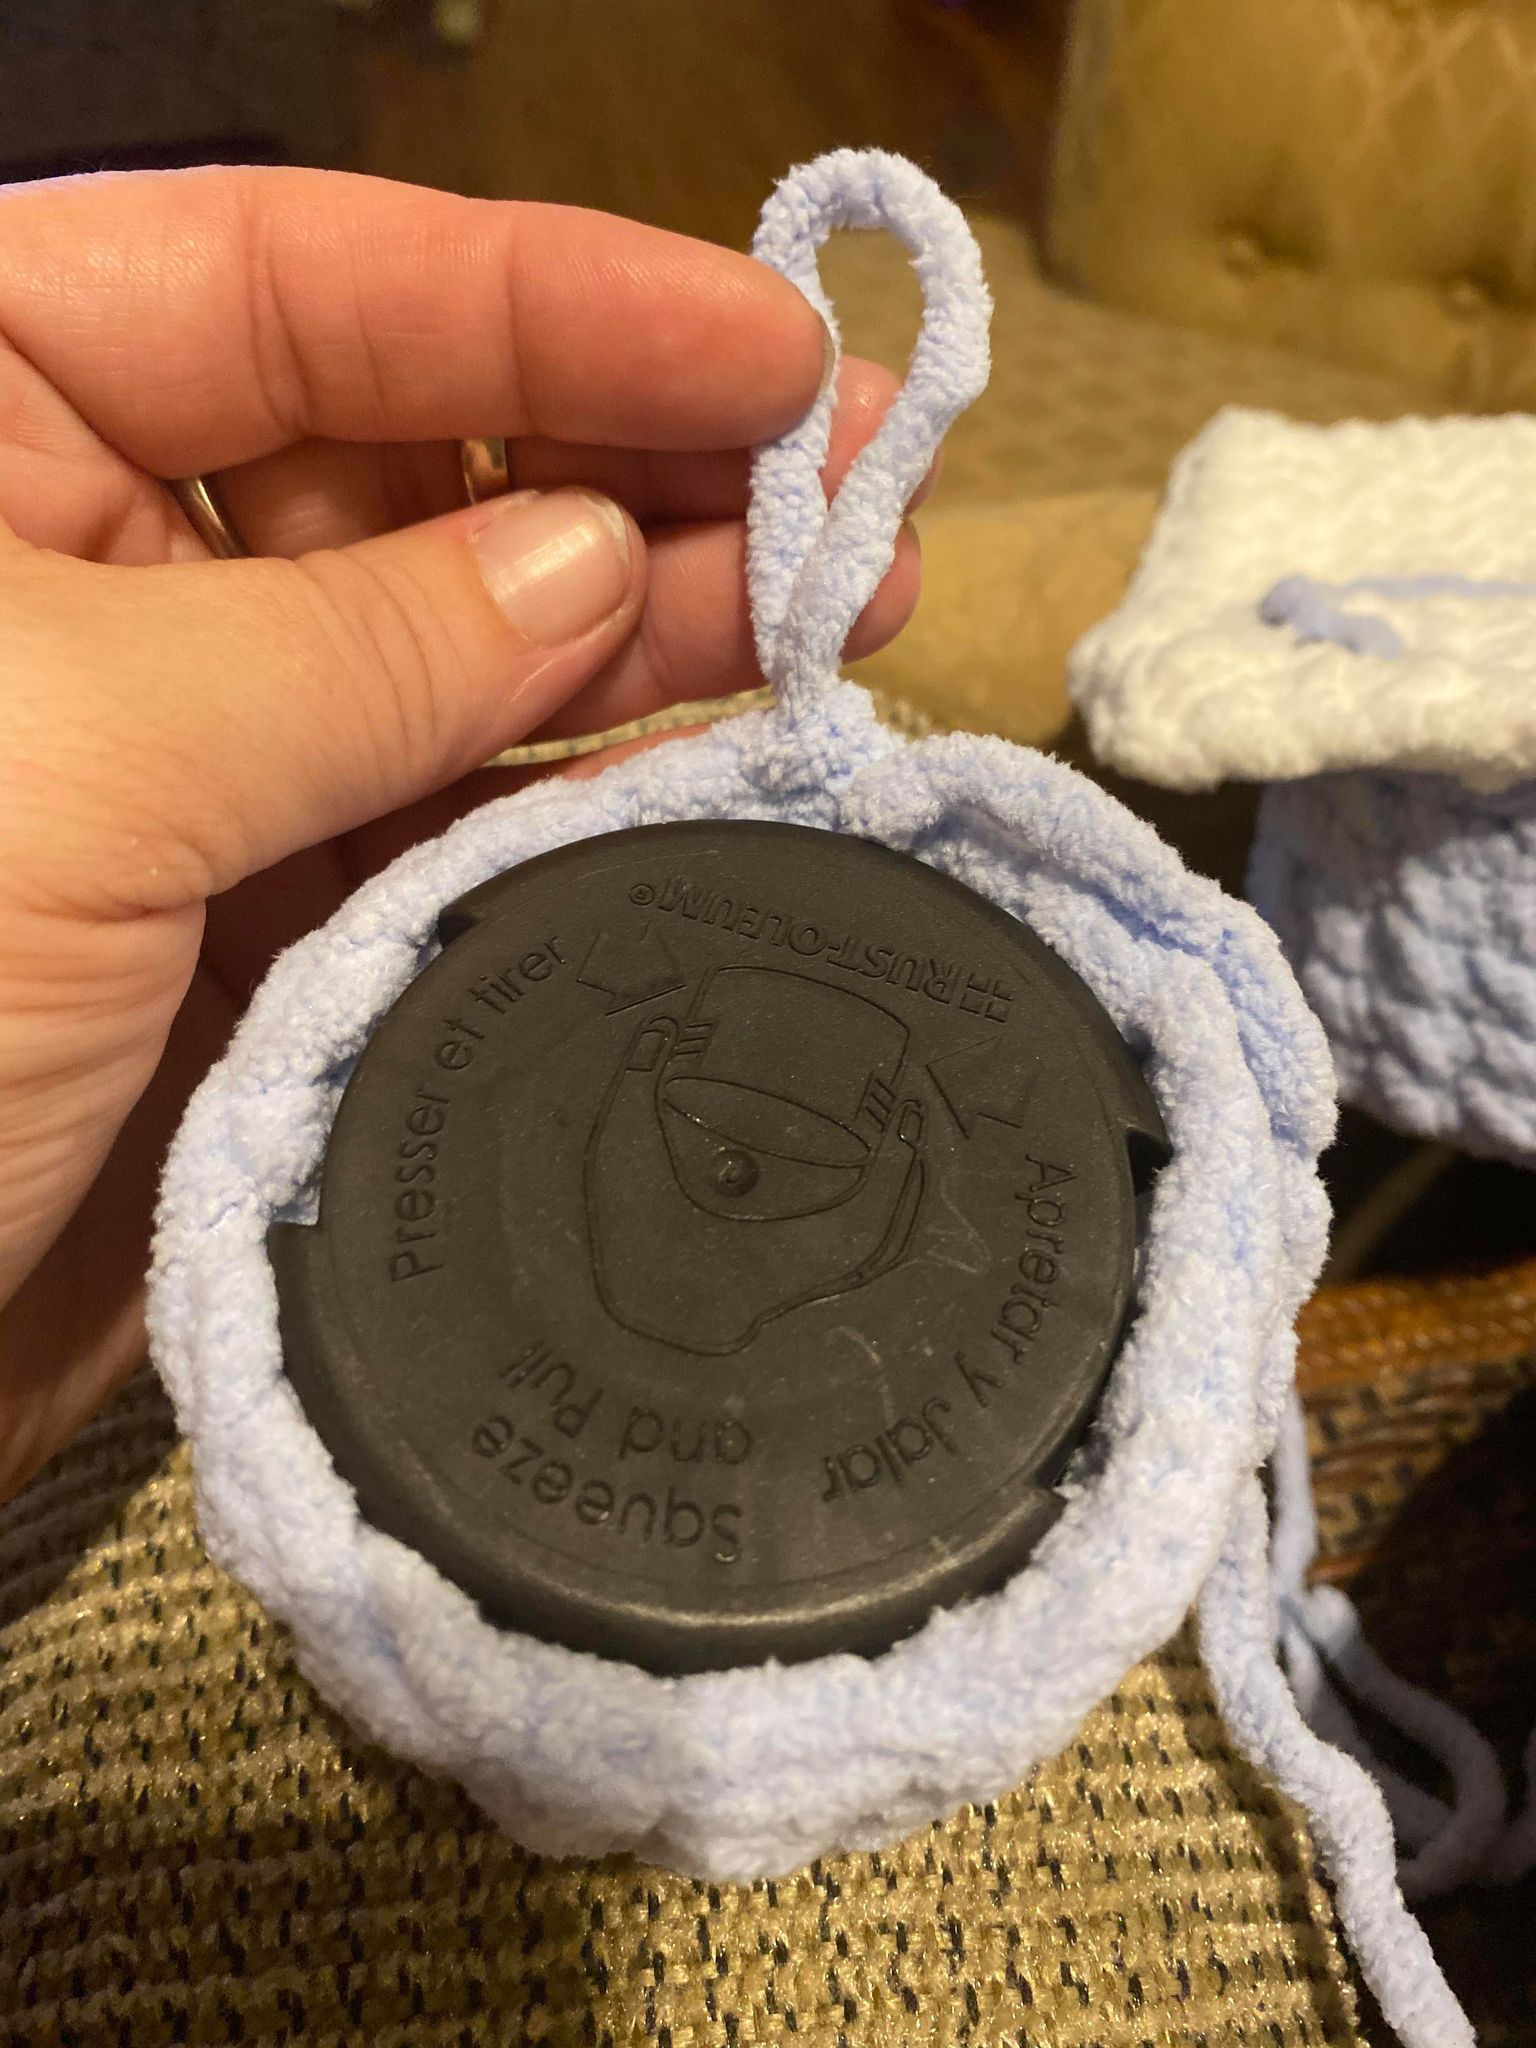

Legs - Make 6

I looked around for items I could repurpose as “legs” or “feet”. We are remodeling so I settled on spray paint can lids destined for the trash.  Hair spray lids, Pam cooking spray, etc. we’re just looking for something to give the feet a bit of strength. 

(If you absolutely cannot find plastic caps designed for the trash, tightly packed poly fill should also work. We just think this looks cooler)

Before beginning, take the piece you finished off, and a black sharpie. Remember the BLO row in the top and bottom of the bed?  That is to keep you from placing the feet out too far to stitch the sides together later. Place the feet evenly just inside the BLO row and the edging rows and trace a circle. We will use this later to guide our attachments and it will not be seen once our bed is finished. 


The feet:

You will make 6, but make one at a time because you don’t finish off at the end of each foot.

Using a blanket yarn in the color of your choice and a size L/8.0mm hook. 

Start with a magic circle 

R1: form a magic circle. Ch1, hdc 6 times. Join to the 1st hdc with a sl st.  (6 ST)

R2: ch1, place 2 hdc in each st around. Join to the 1st st of R2 with a sl st (12 ST)

R3: ch1, *(place 2 hdc in the 1st st st, place 1 hdc in the next st), repeat from * around. Join to the 1st st of R3 with a sl st (18 ST)

You will continue increasing rounds until the piece is slightly larger than the base of the cap you are using. 

R4: ch1, sc in BLO in each st around, join to 1st st with a sl st (18 st)

R5-R9: ch1, sc through both loops in each st around, join to first st of round with a sl st. Do not finish off. 

Work the cap down into the foot cover you just made. The flat part of the cap should be looking up at you. 


Pull the last loop you didn’t finish off on the foot, pull it through the bottom piece somewhere on that black line. Sl st around evenly until you’ve joined all 18 st. Finish off.  Push the bottom of the foot in towards the empty part of the cap, creating a small dome in each foot. Do this to all 6 feet.                                      


Now it’s time to attach the bottom. With your foam inside the top with the sides joined and laid foam facing up, top yarn facing down. Line up your bottom. I count my stitches and use hooks or pins to join the 4 corners to keep myself on track. 
Pick any place and join the corner of the sides and bottom and attach white bernat with an L/8.0mm hook.
 
Ch1, starting in same st, *(2 hdc in same st and 1 hdc in the next st), repeat from * all the way around. Join to 1st st with a sl st, finish off
 

Now you're finished and the toys have a nice repurposed green clean area to get better at the Toy Hospital!